Unlocking Efficiency and Peace of Mind: 10 Key Benefits of Managed Cloud Server Services

Unlocking Efficiency and Peace of Mind: 10 Key Benefits of Managed Cloud Server Services

Businesses of all sizes are increasingly depending on cloud-based infrastructure to fuel their operations in the current digital era. Although they are flexible, scalable, and cost-effective, cloud servers can be challenging to manage effectively. Managed cloud server services can help in this situation. Let’s look at the top 10 advantages of using managed services to manage your cloud servers. 


What is the managed service model ?

A strategy method known as “managed services” involves organizations delegating the management of particular responsibilities, such as IT services or other operational duties, to specialized outside suppliers. With the help of external partners’ knowledge and resources, this outsourcing agreement enables companies to increase productivity, save expenses, and concentrate on their primary goals. Here, we’ll look at the many benefits of the managed services business model and how it’s changing how contemporary companies run.

10 Major benefits of managed service model:

  • Cost Efficiency

The cost savings that managed cloud server services offer are among their most alluring features. Traditional server administration calls for substantial upfront expenditures for hardware as well as continuous operational costs. Managed services have an obvious financial benefit since they have predictable, subscription-based pricing, which eliminates the need for significant up-front investments.

  • Expertise Access

Effective cloud server management requires a high level of knowledge. With managed services, you have access to a group of seasoned experts that focus on cloud infrastructure. These professionals take care of everything from server setup to ongoing maintenance, giving you peace of mind that your systems are in skilled hands.

  • 24/7 Monitoring and Support

Your company should keep running around the clock, and the same goes for server administration. 24/7 assistance and monitoring are provided by managed service providers. This proactive strategy reduces downtime, finds and fixes problems before they become serious ones, and makes sure that your services are always accessible to your clients.

  • Enhanced Security

Today’s corporations are most concerned about security. Security is given top priority in managed cloud server services at all levels. Strong security measures are put in place by them, such as firewall setting, intrusion detection, and frequent security audits. Your data and apps are safe from dangers thanks to these safeguards.

  • Scalability

As businesses change, so do their IT requirements. With managed services, you can quickly scale up or down your cloud infrastructure to satisfy shifting demands. Whether you’re introducing a new product or dealing with seasonal traffic surges, you can adjust without having to worry about acquiring and managing extra infrastructure.

  • Improved Performance

Performance problems can have a negative impact on customer service and corporate operations. Your cloud servers’ performance is optimised by managed service providers. They keep an eye on performance indicators and take preventative measures to make sure your apps function effectively, taking care of any bottlenecks or slowdowns right away.

  • Backup and Disaster Recovery

Modern organisations are data-driven, thus data loss is a terrible situation. Managed services provide reliable disaster recovery strategies and automatic backup solutions. Business continuity is ensured through routine data backups as well as protection against unplanned calamities.

  • Compliance and Regulations

A major issue for firms is navigating the intricate web of compliance obligations. Managed service companies frequently possess experience in a variety of legal requirements, including HIPAA and GDPR. They may aid in maintaining compliance and helping you put in place the appropriate measures, lowering your legal risks.

  • Focus on Core Business

Your IT team may concentrate on critical projects that advance your business by outsourcing cloud server administration. Your personnel can focus their time and skills on essential business operations and innovation as mundane duties, maintenance, and troubleshooting will be handled by professionals.

  • Reduced IT Workload

The responsibility of ongoing IT management is lifted off your shoulders with managed cloud server services. Patch management, software upgrades, and troubleshooting are all easily handled by your supplier, freeing up your own IT staff to work on other important initiatives.

Conclusion: A Bright Future with Managed Cloud Services 

Managed cloud server services provide a solution to efficiency, security, and peace of mind in the digital age. You may save money, get knowledgeable assistance, and have the freedom to concentrate on your main goals for your organisation and constant innovation when you choose a managed service model.

These services hold the key to maximising the cost-effectiveness, security, and scalability of your company and enabling its limitless expansion potential. In order to ensure a better, more productive, and innovation-driven future, embrace managed services unreservedly. You deserve nothing less for your company.


Read More
Avatar admin October 9, 2023 0 Comments

Reason to choose Digital Ocean cloud server for your business.

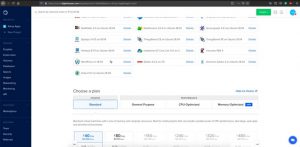
DigitalOcean Cloud server popular in a startup as well as a business because it provides multiple compute options to your business with flexibility. There are four types of Virtual Machine (in Digital Ocean its call Droplet.) are available base on your requirement.


1.  Standard:

Virtual Machines with a mix of memory and compute resources. This Droplet is best for small projects that can handle variable levels of CPU performance, like web site, blog, WordPress site, testing project, etc.

2. General Purpose:

This is high-performance virtual machine with a dedicate hyper-thread intel processor and a good balance of memory. This is great choice of a wide range of projects like production workloads like web app hosting, medium-sized database, ERP, e-commerce website, etc.

2. CUP-Optimized:

Compute-optimized Droplet with dedicate hyper-thread from best in class intel processor. Best for CPU-intensive apps like machine learning, ad serving, video encoding, application service, etc.

2. Memory-Optimized:

This server with high RAM with dedicate hyper-thread best in class intel processor. This Droplet is the best suite for high-performance databases, web-scale in-memory caches and real-time big data processing.

Combined with industry- leading price to performance that removes the complextiy from your monthly bill

No Matter what kind of website, application or project that you plan to run on DigitalOcean, DO have the right virtual-machine to power your business. With hourly pricing and flat pricing across all data centers, you can ensure you are paying for the right amount of infrastructure.

Following Digital Ocean products, support is available to run your business smooth.

  • Managed Kubernetes
  • Managed Databases
  • Space Object for Storage
  • Team Management
  • Global Availability

Thousands of companies trust Digital Ocean to run their businesses. Arkay Apps,  Digital Ocean  Solution Partner in India provides Digital Ocean managed, consultants, Maintenace service to India.  let’s connect us for a half-hour free consultant with our expert.  for more detail at sales@arkayapps.com OR skype: arkayapps

Read More
Arkay Apps Arkay Apps December 27, 2019 0 Comments

Setup WordPress on DigitalOcean Cloud Server

Digital Ocean is a fastest-growing developer-friendly cloud hosting solution companies focus on simplicity and scale. Today we are going to learn how to set up (Install) and configure WordPress on DigitalOcean Cloud Server Droplet.

Getting started, you need a domain name to use this One-Click, which you can purchase from any domain registrar You can purchase it from Google Domains, Godaddy, etc.  

If you do not have DigitalOcean account you can create one and get $100 Free credit.


Let’s start step by step WordPress setup.

Step 1: Create a droplet

  • Choose an image, go to the marketplace and select WordPress on 18.04.

  • Complete the remaining droplet creation steps.

After that, you’ll need to log into the Droplet via SSH to finish the WordPress setup. This restricts the setup wizard from being visible to the internet until you’re ready to complete it. If you try to visit the Droplet’s IP address before logging into the Droplet, you’ll see a DigitalOcean landing page.


Step 2: Access Droplet via SSH

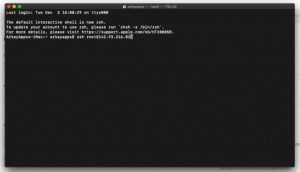
  • Start terminal on your local computer, connect to the Droplet as root. Make sure to substitute the Droplet’s IP address.
ssh root@use_your_droplet_ip

If you did not add an SSH key when you created the Droplet, you’ll first be prompted to reset your root password.

Then, the interactive script that runs will first prompt you for your domain or subdomain.


Step 3: Set domain

An A record from the domain (e.g., your-domain.com) to the server’s IP address.

An A record from the domain prefaced with www (e.g., www.your-domain.com) to the server’s IP address.

Next, the script will ask you to enter your domain.

Step 4: Setup WordPress administrative user

Next, the script will ask you to create the administrative user for your new WordPress blog. These are the credentials you will later use to log into your new site from your browser.

  • Enter the email for the admin user which is used for password recovery if needed.

  • Set a username and password.
  • Now enter the Blog Title – This can be changed later through the web interface.

Step 5: SSL(https) configuration

The next step asks if you want to use SSL for your website via Let’s Encrypt, which we recommend.

  • Next, you have the option of configuring LetsEncrypt to secure your new site. Before doing this, be sure that you have pointed your domain or subdomain to this server’s IP address. You can also run LetsEncrypt certbot later with the command ‘certbot –apache’.
Would you like to use LetsEncrypt (certbot) to configure SSL(https) for your new site? (y/n): y
  • Next, you have the option to choose https over http to redirect your traffic.

If you like to redirect all your traffic then select 2 otherwise select 1.

After you respond to these prompts, you’ll see a confirmation message.

WordPress has been enabled at http://your-domain.com Please open this URL in a browser to complete the setup of your site.

At this point, you should visit the Droplet’s IP address in your browser to see your new site and visit http: //[your_domain]/wp-admin to manage it.

Once the installation is complete, you can use the WordPress admin dashboard to customize the new site.

For reference:

  • The MySQL root password is in /root/.digitalocean_password.
  • The web root is /var/www/html, and the WordPress configuration file is /var/www/html/wp-config.php.


In addition, We recommend you take a few customized setup steps:

when hosting multiple sites creating an Apache virtual host file for each site maintains the default configuration as the fallback, as intended, and makes it easier to manage changes.

To do so, you’ll need to create two things for each domain: a new directory in /var/www for that domain’s content, and a new virtual host file in /etc/apache2/sites-available for that domain’s configuration.

If you didn’t enable HTTPS during the initial setup script, you can enable it manually at any time after the fact.

Setting up an SSL certificate set up HTTPS on the webserver, which secures the traffic between the server and the clients connecting to it. Certbot is a free and automated way to set up SSL certificates on a server. It’s a part of the WordPress One-Click to make securing the Droplet easier.

To use Certbot, you will need a registered domain and two DNS records:

  • An A record from the domain (e.g., your-domain.com) to the server’s IP address
  • An A record from the domain prefaced with www (e.g., www.your-domain.com) to the server’s IP address

Additionally, if you’re using a virtual hosts file, you’ll need to make sure the server name directive in the VirtualHost block (e.g., ServerName your-domain.com) is correctly set to the domain.

Once the DNS records and, optionally, the virtual hosts files are set up, you can generate the SSL certificate. Make sure to replace the domain in the command.

CMD – certbot –apache -d your-domain.com -d www.your-domain.com

HTTPS traffic on port 443 is already allowed through the firewall. After you set up HTTPS, you can optionally deny HTTP traffic on port 80:

CMD – ufw delete allow 80/tcp


Reference:

[1] https://marketplace.digitalocean.com/apps/wordpress

Read More
Harsh Gor Harsh Gor December 19, 2019 0 Comments

What is load balancer? How to setup load balancer in DigitalOcean

Load Balancing manages workload between two or more computers(machines). The advantage of load balancing is that allows for more efficient use of computing resources and prevents anyone machine from being overload. This is very important for high traffic website.

In short, Load balancers manage traffic to groups of Droplets, which decouples the overall health of a backend service from the health of a single server to make sure that your services stay online. [1]

There are two steps for creating load balancing.

  • 1. Creating a load balancer.
  • 2. choosing droplet for its backend.

1.  Create Load Balancers

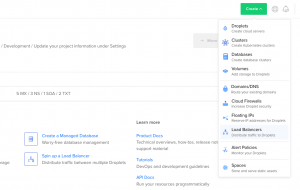
Step 1: Start by creating a load balancer using the Create button at the top of the control panel.

On the creation page, you will:

Step 2: Choose a datacenter region. Your load balancer and its backend Droplets need to be in the same datacenter, so choose the region where your Droplets are or will be located.

Step 3: Add forwarding rules. Forwarding rules define how traffic is routed from the load balancer to its backend Droplets. You need at least one rule.

The default route is HTTP port 80 on the load balancer to HTTP port 80 on the backend Droplets. If you want you can create new rules during creation with the New Rule drop-down. After creation, you can modify a load balancer’s rules at any time on its Settings page.

Step 4: Finalize and create, which includes Choose a name and Select project. Load balancer names must be unique and contain alphanumeric characters, dashes, and periods only. 

Video of Create LoadBalancer and setup up Droplet.


2. Select Droplets

After you create the load balancer, you’ll be brought to the load balancer’s detail page where you can add Droplets to it. Click Choose Droplets to open the Add Droplets window.

You can add individual Droplets or you can choose a tag. You can only choose Droplets that are in the same region as the load balancer.

When you’ve selected the tag or Droplets, click Add Droplets. The load balancer will check the health of the backend Droplets. Once the servers have passed the health check the required number of times, they will be marked healthy and the load balancer will begin forwarding requests to them.

Once you have at least one load balancer, you can view and manage them on the load balancer index page.


3. Load Balancing Algorithms

The load balancing algorithms provide different advantages; the choice of load balancing method depends on your needs:

Round Robin – Requests from clients are spread out across the group of servers sequentially.

Least Connections – A new request from the client is sent to the server with the fewest current connections to clients. [2]

Conclusion

So we can say that load balancer is a very useful utility for large scale projects for handling sudden hike of incoming requests. And digital ocean provide this useful utility in very few steps and in hassle less manner.

Arkay Apps  is DigitalOcean cloud partner we provide cloud server maintenance server let save your time we all manage on server maintenance. let’s arrange meeting with our expert.


Reference

  1. https://www.digitalocean.com/docs/networking/load-balancers/
  2. https://www.digitalocean.com/docs/networking/load-balancers/how-to/create/


Read More
Harsh Gor Harsh Gor November 30, 2019 0 Comments

How to Host multiple website on One Droplet on Ubuntu Linux 14.04 LTS.

How to set up multiple domains in one droplet Digital Ocean.

Now DigitlOcean cloud server price is just $5 (350 INR) per month it lowest cost server also you can host multiple website on one single droplet. Here Droplet means one Instance. On Digital Ocean you can choose any size on droplet price are depend on RAM and Storage location etc.

Here today topic we try to explain How to host multiple site on one droplet. We are assume that you have already install LAMP (Linux, Apache, MySQL and PHP).

Note:  Before We start. 
If you don’t have a DigitalOcean account yet, first you should sign up to get one. For new users, DigitalOcean offers a free $20 credit. Click on this link to sign up at DigitalOcean to get the $20 credit.

let’s Start Setting up multiple websites on a Digital Ocean single droplet step by step.
 

Step #1 : Plz Check A Record on DigitalOcean DNS

Now Login on server through SSH

Step #2 : Make Directory of domain name:

sudo mkdir -p /var/www/html/domainname.com/public_html

Step #3 : This directory is on root access let’s give permission to current user

sudo chown -R $USER:$USER /var/www/html/domainname.com/public_html   

Step #4 : Change Mode of www folder.

sudo chmod -R 755 /var/www	

Step #5 : Create simple index.html file for testing purpose.

sudo vi /var/www/html/domainname.com/public_html/index.html	

Step #6 : Create new Virtual Host File

sudo cp /etc/apache2/sites-available/000-default.conf /etc/apache2/sites-available/domainname.com.conf

Step #7 : Edit and set Parameter on Virtual Host file

sudo vi /etc/apache2/sites-available/domainname.com.conf	

Step #8 :add this parameter on VirtualHost

    ServerAdmin admin@domainname.com
    ServerName domainname.com
    ServerAlias www.domainname.com
    DocumentRoot /var/www/html/domainname.com/public_html

Step #9 : Enable the New Virtual Host Files

sudo a2ensite domainname.com.conf  

Step #10 : Restart Apache server

sudo service apache2 restart

Step #11 :Check your on browser

Lets ping through browser. 	


Conclusion

Hosting multiple websites on a single Ubuntu l14.04-its server is that easy. Remember, you can replicate the idea to host unlimited number of virtual hosts.

Read More
Arkay Apps Arkay Apps December 25, 2018 0 Comments

Best Cloud Server for Start Up – Digital Ocean Server

Are you running startup or business? In initial stage while running startup on low cost we searching best service on low cost. For every Information Technology startup need to host his information on cloud for that we need to research How to choose a cloud computing technology for my start up? Today world so many company provide cloud services that make us confuse which one is best for me. Let me share our experience on cloud Infrastructural.

Today in this blog we are going to discusses about the Why Startups should consider Cloud Computing as the Best Hosting Solution and why we as start-up in web design and web Deployment Company chose DigitalOcean cloud server technology for best hosting

Do you know Our team just setup cloud server just 1 days and move all Godaddy to Digital Ocean.

Let’s Talk about what is Digital ocean cloud server and why its best cloud hosting provider in India.

DigitalOcean is a cloud computing platform, providing cloud services. It is very popular with open source developers as it helps to run applications simultaneously on multiple computers. In less than five years, this New York-based startup has become the most popular cloud hosting company among developers because Its user interface is super simple There are just enough links and buttons that give you access to the available functionality to one-click setup for various mixed applications and support the modern Linux distributors like Ubuntu, Fedora, Debian, and CentOS.

Why would you consider DigitalOcean over another cloud infrastructure provider?

There are number of reason why you should chose best cloud computing hosting in India as DigitalOcean. So many cloud hosting companies in market who provide the cloud hosting but the no one can provide the SSD cloud server with a low price, which starts at $5 per month. That why we believe Digital Ocean is best cheapest cloud server. Let’s discuss in detail why it’s best private cloud hosting

1. Affordable Price

DigitalOcean design his own price structure start with $5 a month subscription. The least expensive “droplet,” which is what DigitalOcean calls a virtual machine, costs US$5 a month, or about $0.007 cents per minute, and features a single CPU core between 2GHz and 3GHz, 1GB of working memory, 25GB of storage and 1 terabyte of data transfers. There are no any complex price calculation but its most affordable and simple price structure to understand.

2.  Server location and Data Centres


DigitalOcean has total 12 datacentre among them 3 are in New York, 2 san Francisco, 3 Amsterdam, 1 Singapore, 1 London, 1 Frankfurt, 1 Toronto, 1 Bangalore, India. When you have nearest datacentre the content delivery process become fast so your site conversation rate will increase. Let’s have example.

When you search on google. “Website Development Company in Bhuj” first google will find this keyword from nearest database which is India and display the result. What if your website hosted in USA server then google will find India then USA then display the result.

Click here to test the Digital Ocean Server speed so you will get clear idea that Why Digital Ocean Cloud Hosting Stands out as the Best Hosting Solution in India.

3. Well Documented 

Really i am very fan for DigitalOcean Document. DigitalOCean has as best community around world also encourage developer write technical help article.

In cutting-edge technology support is most important here you can launch anything from CoreOS. There also given sample step for launch LAMP (Linux, Apache, MySQL and PHP) setup. Also help how to provide basic security step same as other provide.

Digital Ocean have well documented that’s save your lot of time on server setup.

Signing Up a Account with Digital Ocean

If you don’t have a DigitalOcean account yet, first you should sign up to get one. For new users, DigitalOcean offers a free $20 credit. Click on this link to sign up at DigitalOcean to get the $20 credit.

Recent News of Digital Ocean server

Developers do bidding for startup against giants AWS and Google

How DigitalOcean became the world’s second largest web hosting provider 

DigitalOcean gives you more RAM and storage for the same price

DigitalOcean adds free monitoring to its cloud virtual machines DigitalOcean Revamps Compute Plans and Pricing Structure

While Amazon and Microsoft battle in the cloud wars, this startup quietly built a $175 million business by picking up their slack

Ben Uretsky, CEO @ DigitalOcean on Scaling To 1m Customers with No Sales Team

Cloud wars heat up: DigitalOcean goes up against Amazon

Conclusion

By now, you should have a decent understanding of how Digital ocean cloud hosting is the best website hosting for your stratup business. We as Arkay apps is website design and software deployment company based in Bhuj Kutch always ready to give you consulting service for mobile app development start-up.

Let us know of any setups you recommend or would like to learn more about in the comments below!


Read More
Arkay Apps Arkay Apps December 25, 2018 0 Comments